My blog has moved!

You should be automatically redirected in 6 seconds. If not, visit
http://tokejepsen.wordpress.com/
and update your bookmarks.

Thursday 11 December 2008

Advanced Techniques - Week 9-15

Hello there... This article isn't actually as boring as the title might suggest, got quite a bit to show.

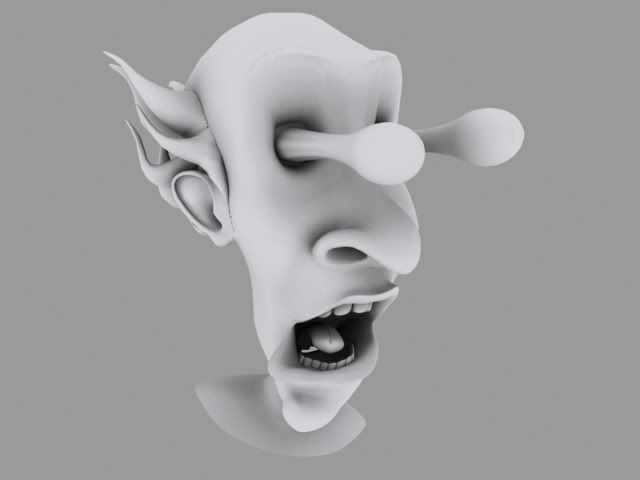
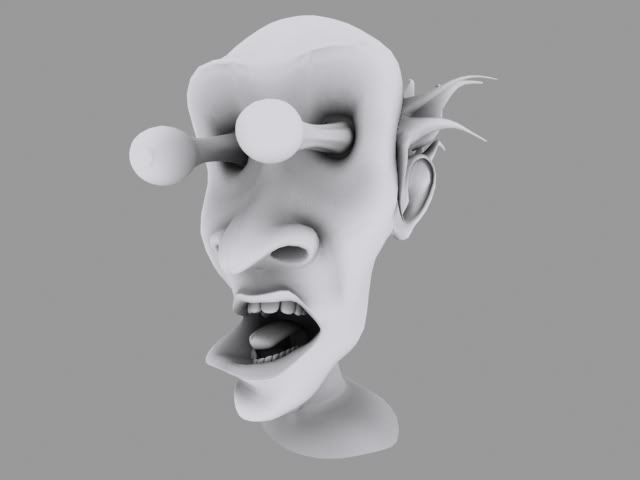
So the project is three part; Poly Modelling, Rigging and Textures and Lighting. The project is about introducing us to advanced techniques within the three areas. First off the poly modelling. Here we had to do a class exercise of modelling a bug. A bug is usually pretty simple since most bugs have the skeleton on the outside and so have quite hard surfaces. This makes it ideal for working from simple geometric shapes. But as I decided to take this challenge a little bit further, and make a bug with character (the video below is the wireframe turnaround, which is why there is those lines all over the model):-


The reason why we have to the model in wireframe is for the tutor to see how we build the model. Its all about how clean lines look, and how many you are using. I dont wanna go into too much about the technical stuff about poly modelling, but a poly is basically the surface between the lines. Ideally you only want the lines to form squares, and not triangles or ngons (pentagons, hexagons, heptagons, etc.) The next bit was to model a hand, with the intend to animate it. When you model for animation, it is important not only to have quads (square polys) but also to think about edgeloops. Edgeloops are a string of lines, and you want those to run efficiently around the model. Good edgeloops helps deform the skin properly when you put a skeleton (rig) in. Bad egdeloops dont.... So heres my planning for the hand:-


And the turnaround of the final model in low poly, high poly, shaded and textured state:-


That's the first part of the project. The next is about rigging. The rigging process is very technical, and in my opinion there is not a lot creativity in this stage. That being said I still really enjoy the rigging part because I'M A NERD!:-)
Rigging is basically about putting in the skeleton, and telling the program how the skin (object/model) is gonna behave. This stage is crucial for the animation since a crappy rig can really slow down and limit your animation. So to show the rigging you do a deformation test, which is a video where you bend all the joint separately. Quite boring, but a necessary evil for the animation. Here the deformation tests of my bug and the hand:-


Another part of this project was the texturing. For this project we were only to generate procedural textures and not painted ones. The difference between the two is in the making. Procedural textures are generated from mathematical formulas, while painted ones is generated by.... ermmm painting. A more detailed explanation would require going into areas like UW mapping, which is extremely boring (unless you are a nerd:-) so Ill spare your brain this time around. For the project we had to do a realistic skin texture and some stylistic ones, so here they are (click the images to view a bigger one):-

The last part of the project is lighting. The job was to create a scene and light it for dawn, midday, dusk and midnight, with a focus on realism. So here's my planning(click the image below to view the planning):-


And this is what I got out of it(click the images to view a bigger one):-


The lighting of a scene or character can really make or break it. Lighting a scene is not just about illuminating, but more about creating a mood. For example if you had a room with a bed in it, you can then suggest a feeling about the bed. Light the room with harsh florescent lights, and you get the impression of a hospital bed. But if you light the room with yellow and red lights with soft shadows, then you might think its a normal bed. The point is that with the same model, you can suggest different feelings with the lighting.

That's it. I really tried not to make it a too technical article, but that's probably the same trying not to get wet while you swim:-s
Right so the future for me entails the major project, which in my case is gonna be a short film. The making of this is gonna span for the rest of the school year. So it might be a while before the next big update, but I will most likely give smaller updates of where I am in the process.

For now I will just wish everyone A MERRY CHRISTMAS and A SPLENDID NEW YEAR!!!!

Sunday 16 November 2008

Character Animation - Week 3-8

As promised the next article... Character performance or acting is what this project is all about. Its our first real encounter with proper acting, and the techniques of acting. And goddamn its difficult...

So the project's objectives is to find an audio clip with someone speaking, develop a suitable character for the dialogue, and animate the character.

The first task of finding the audio clip was a bit more challenging than I initially expected. Although we had all forms of media to choose from, ei. radio, movie, audio book, interviews etc. The problem was in the specifications that we were recommended to follow. Firstly its a single character talking for 10ish seconds, which limits a lot of dialogue. Secondly it had to be interesting, and that's not interesting as in what the person is saying, but how its being said. We basically needed to find a character talking for ca. 10 seconds, whom experiences an emotional change expressed through the voice.
I finally found a piece of dialogue I was happy with. The audio clip is from a movie called "Boondock Saints" with Willem Dafoe playing a detective trying to solve some murder cases (there is only black screen, so you can hear the audio on its own):-


With the dialogue clip in place, I could proceed onto developing a suitable character for the performance. My initial idea for was a teacher. The setup would be the teacher having a go at a pupil. This idea I developed further with design sketches. Though when I had discussed the character with friends and mentors, I found the idea to be weak. It was too generic to just have a teacher. I then went back to the idea stage, and explored other ideas like a caveman, psychologist, priest, TV presenter (at Countdown or the danish "Lykkehjulet"), Jesus, judge. The one I found to be most promising was the idea of a priest. Then after some further exploring, I combined the two ideas to a sunday school teacher at a catholic church. The designs and the rest of the preproduction can be view here:-


Further in the this stage there is the figuring out who your character really is, like; his age, his name, his upbringing, sexual orientation, temperment etc. All this is never shown on camera, but it helps me to understand who this person is and how he might react in a certain situation.

The next thing to do is the acting. This is an extreme weak spot of mine, and my god I need to get better. Just need to practise I guess. After this project I have a much greater respect for actors/actresses for their performances on screen. Anyway here the best reference I did:-


As you can see I didn't give myself very much to go on. So the caricaturering and nice poses need to be created in the thumbnails. The thumbnails can be see in the flatwork at the end. To get a better understand about whether a pose or the whole sequence works, you need to make an animatic. An animatic is a simpel animation, usually drawn since its easier to draw a pose than having to pose a character. This stage is used to determine when, and how long a pose should read. The animatic can then later be used a blueprint for when you pose the character in a 3D application. Here's how my animatic looked:-


Since this is my first animatic, I learn a lot during the process which I can use the next time. One thing in particular is the level of detail I should but into the animatic, which is a lot more than I did for this one. One of my teachers alerted me to the second function of the animatics, which is for the directors. The director or superviser should be able to watch your animatic, and get a pretty good sense of how the final thing is gunna turn out. This way they can adjust the changes before the animator gets too stuck in the animation (even then they might change a lot of stuff). So for the next time I should be more descriptive in the animatic...

We can now move on to the blockout stage. Here I follow a well tested process of creating the animation, which originated from Keith Lango. In the blockout stage you focus on creating the keyposes and breakdowns, and more technically your animation jumps from pose to pose. This makes is easier to focus on just the poses, and not worry about inferior animation like lip-sync. Here my blockout:-


There is quite a difference between this and the final thing. The whole process is a working progress, and poses are constantly changing because of feedback from the director/audience. I had a quite a few people to look a the different stages, which provided me with incredibly important comments and changes. So if you are one of those people then I thank you for the awesome input and I'll most likely ask again for some feedback:-)

Alright so the next I want to show is the final thing, BUT before I do that I want to make sure that you might understand the amount of work that is put into this (6 weeks of my life:-s). The process of going from the blockout stage to the final thing is a big step, so I'll show you a screen recording of one hours worth of work. The video is fastforwarded about 20 times realtime:-


This is a really boring video to watch cause I don't do a lot. I just seem to fiddle about with the head/neck/eyes. But this is nearing the completion, so its a lot about adjusting small details, and not actually creating any poses. So I'll hopefully remember to make a more interesting timelapse the next time around, maybe early in the blockout stage where you can see the creation of each pose.

I think I have been ranting on a while now, so I'll just show the final rendered version:-


And now you might say; "You SPEND 6 week of you life on these measly 13 seconds of animation!?!?"..... but hopefully I have given you a bit of insight of what I have been doing with those 6 weeks. Apart from the animation, I have learnt a ton about acting and character performance. So I'll be able to make some more interesting animations from now on. Further I have been working on other personal projects, which I will be able to show at some point in the future (what a tease:-)

Hope you enjoyed the random brainjuice spilled onto this article, I will leave you with the original video clip from the "Boondock Saints":-


Wednesday 29 October 2008

Storyboard - Week 1& 2

Hello Hello, quite some time since I updated the blog. I the meantime I have started on the second year of my course. Currently I'm in the last phases of my minor project, this being the reason why I haven't updated my blog because I thought that I would get the minor project on the update as well. BUT I felt that I should give a little prelude and say that I'm still alive and animating:-)

So the first two week of in the brand new ATRiuM building (that's not a typo , that's apparently how its spelled), started with the storyboard project. Storyboards are thumbnail like images of the camera angles, shot sequence, action sequence, dialogue sequence and basically everything. In animation storyboards are one of the most important processes in the development of an animated sequence, as this stage can simply make or break the movie/animation.

To make any film sequence, live action or animation, interesting you need to have some dynamic shots, else the audience is gonna get bored very quickly. In live action you can just go out with your camera and find them, but in animation we have to build them. This is why the storyboard is immensely more important for animation than live action. If you can plan the shots before building them, you can save time and money.

For the protect we had to make two storyboards. The first was to storyboard an advert. Find any advert, live action or animated, analyze the shots/action and draw a storyboard based on the advert. This is the reverse of what a storyboard process is, but it was to get us into the concept of storyboarding and learn what the professionals do to make a shot interesting.
I chose an animated commercial from Framestore (http://www.framestore-cfc.com), that they did for the bank Abbey (http://www.abbey.com). Click the image below to view the advert:-


A simply gorgeous piece of animation from the makers of the polar bears in "The Golden Compass". Absolutely a dream workplace!!!!

As you can see the advert hasn't got that many shots (14 to be exact), but there is a ton of movement that needs description for the animators to follow. And so here is my attempt (click the images below, to view a larger version):-


The second part of the project was to storyboard to a script. The script was an episode to the Teenage Mutant Ninja Turtles series. Now this was where the real fun comes in, when you sit and invent the shot on your own. It can easily go horribly wrong, but if you get into the thought process of camera angles, you can get quite creative with it. Before throwing one self over camera angles, you should read the script very carefully. We each got one page assigned, where mine was page 33:-

ronnie

I wouldn’t do that if I were you.

Donatello picks up a mobile phone, dials.

donatello

I know what I’m doing.
(a beat)
It’s ringing.

int. national phone switching network - night

The Globfather reacts.

globfather

So, those Turtles think they can tap into this network, do they? Well, they’ll soon regret it.

PUSH IN on the Globfather as his expression turns evil.

back in the turtle van

Donatello reacts as the Globfather’s face appears on his monitor screen.

globfather

You’ve dialed the wrong number, fool.

Suddenly the “fold out gun” drops down.

leonardo

He’s got control of our weapons! Get down!

Leonardo pushes Donatello to the deck as the gun fires, blows the opposite door off. Donatello rolls out. Leonardo grabs him, holds onto him as...

the two guns on the roof

suddenly aim upwards and fire, blowing...

a radio antenna

off the top of a building. It falls, crashing to...

the street

as the Turtle Van swerves, barely avoiding it.


The story before this is that the villian (Globfather) has stolen a protein computer, which he has used to hack into the National Phone Switching Network. This allow him to control all electrical equipment. Ronnie is the son of Professor Huxley, the inventor of the protein computer. The Professor is held hostage by the Globfather. That basically what you need to know now. The storyboard turned into this
(click the images below, to view a larger version):-


If you wanna see who the professionals handled the same scene, then here's the link to the episode; http://uk.youtube.com/watch?v=2YmzW2NNyzY&feature=related, my scene is 3:06 into the video.
I my opinion I think my version of the scene is better:-)

Thats it for now, Ill be back soon with the minor project. Hope you enjoyed the post....

Wednesday 27 August 2008

Summervacation stuff..

Alrighty then. This is the last days in Denmark, before travelling back to the UK to start the new life in Cardiff!! I'm very excited about that, and simply have been all summer. But I had to get the time going somehow, so I have been practicing a bit.

First of all; drawing! I was ordered specificly to practise my drawing skills during the summer from my tutors. And as a good student I have been practising. I started on hands/feet (my own), but this got pretty boring very quickly. As naked people are hard to come by, I had to spent a lot of time in museums, drawing after sculptures.


As you might notice some of the sketches are freestyled. One of the doodles I did, I simply enjoyed so much that I had to try and do it in 3D:-


This is still a WIP (Work In Progress), and something work on when I feel like it. But here is the progress so far:-


My intention is to take this one into a sculpting program to do the fine detailing. A sculpting program basically allows you to add details like wrincles, vein and skin texture. I just need to get happy with the base first.
And now when we are on the subject of sculpting application then I have played around a little bit with Mudbox, a program we are going to use next year. Here are my doodles:-


I hope you can see that its a female and male back. Its really harder than it looks in the video tutorials, but its really fun. I struck a dead-end though, with my laptop and no tablet it kinda makes the process tedious and slow.

So other things I have done during the summer is a small assignment from a friend of mine; Henrik Bacher. As a progamming student he is making a small program that needed some illustration. Here they are:-


Lastly I kept my animation skills up by entering small competitions on; www.threedy.com. The first topic was wrestling move, where I basically tried to copy a move I researched:-


The second topic was fishing, where I went all out on trying my best:-


Well that was it for this time. I didn't talk a lot this time, but at least I had something to show:-) Next stop..... Cardiff!!!!!